Introduction
Genelec has spent over four decades creating the world’s finest active loudspeakers. By helping audio professionals produce accurate, reliable mixes that translate consistently to other rooms and playback systems, they’ve set the global standard for music, film and broadcast reference monitoring. Genelec has put together a useful guide to help you understand the key principles of working effectively with reference monitoring loudspeakers so you can achieve the best possible listening experience in your studio space.
A reference monitor is more than a good sounding loudspeaker. It is a device used in the process of recording, mixing or broadcasting audio in any environment where accurate listening is needed. As a professional tool, a reference monitor must reveal the truth about the audio signal being monitored. It should not add to, remove or mask anything contained in the audio.

Selecting The Right Monitors
Selecting a monitor that is the right size and power for your room is crucial. Genelec recommends monitors based on the maximum Sound Pressure Level (SPL) you need – and listening distance affects that. There’s little point buying a large monitor if your room is too small to facilitate the SPL that monitor will produce and vice versa. Also, do you need a sub? Subs can add low end extension and increase the overall SPL of the complete system. If it’s critical that you hear low end frequencies below what a typical 2.0 setup will produce or would like to increase the overall SPL of your system without buying a bigger set of monitors, a subwoofer may be needed. If this is the case Genelec offer a range of Subwoofers that perfectly match different monitor sizes.
Identifying Your Listening Area
-
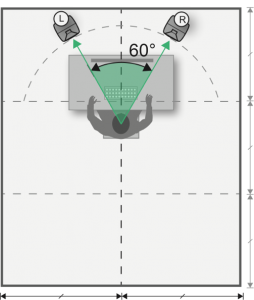
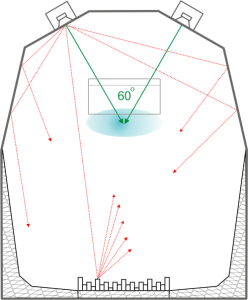
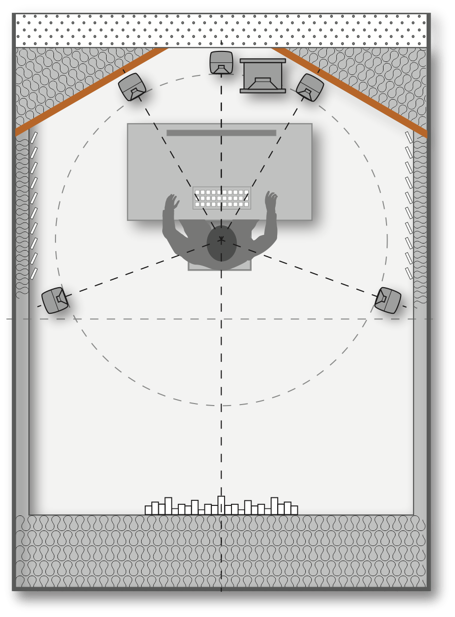
A monitor should be placed in an optimal position in the room, a location offering minimum influence from the monitor’s surroundings and the room. This is because, what we hear is limited not only by our listening ability and the monitor’s performance, but also by the room acoustics and how the monitor is positioned in the room. From the monitoring position the angle between the left and right monitors must be 60° degrees, ideally positioning the listener at the tip of an equilateral triangle. Each monitor should be aimed towards the listening position.

Bass and Walls
-
Boundary Loading In A Room
A monitor radiates low-frequency sound in all directions – this is OMNI directional. Because of this, sound level increases when sound is reflected by nearby walls. Every additional wall close to the monitor doubles the sound pressure level. A monitor with a free-space (no walls) produces a flat frequency response. Placed against one wall produces +6 dB increase in SPL gain. In a corner (two walls), the dB wall gain can increase to 12 dB. Having three close boundaries (e.g. in a corner by the ceiling), the gain can increase up to 18 dB.

-
As you can see low end frequency volume can stack up quickly and affect the tonal balance of your speakers at your listening position. This can be resolved with either manual in speaker EQ adjustments or automatic software calibration like Genelec GLM – more on this later. On the other hand low end phase cancellation cannot be fixed in this manor. Let’s take a look at phase cancellation and the best methods to reduce it.
How To Address Low End Frequency Cancellation
-
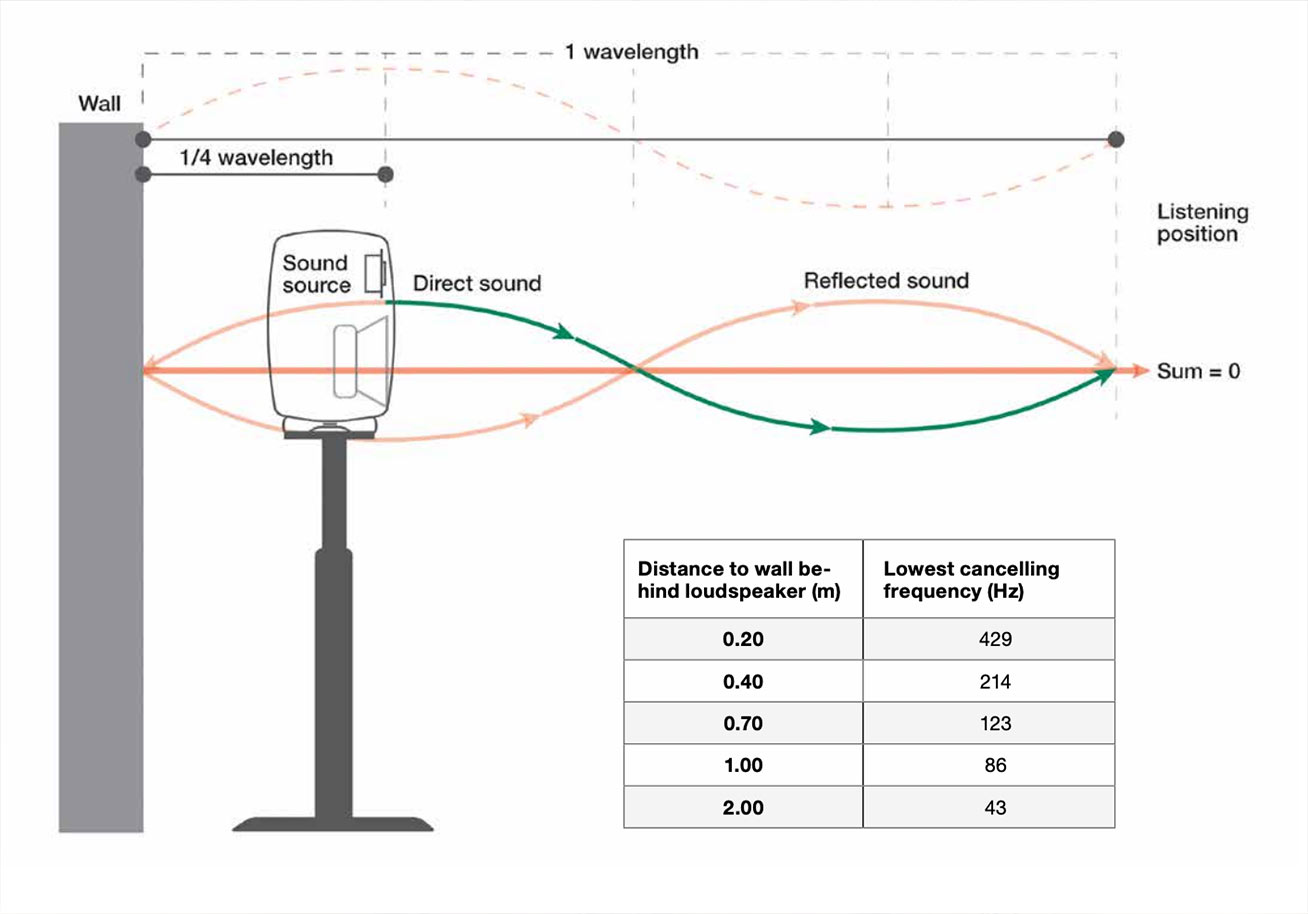
Rear Wall Cancellation
When there is some distance between the monitor and the wall, sound takes some time to travel to the wall and then back to the monitor. Genelec states that at the frequency where this total distance is equal to one quarter of the sound wavelength, the reflection is out of phase with the sound output of the monitor – the reflected audio cancels the audio from the monitor, reducing the monitor output. How much level reduction occurs depends on how much sound the wall reflects. Cancellation can happen at all frequencies but is most extreme in the low frequency spectrum.
In this diagram: when a speaker is placed 1 meter from the wall there will be a cancellation at 86 Hz when measured at the listing position.
-
How to Avoid Phase Cancellation
Push the monitors close to the back wall. The distance measured from the monitor front grill to the wall behind the monitor should preferably be less than 0.6 metres (2 ft). However, a keep in mind a monitor needs a minimum clearance of 50 mm (2 in) to the wall to ensure full output from a rear bass reflex port if the monitor has one. This will ensure the cancellation takes place far behind the listening position.
Alternatively, if you have the space pull the monitor sufficiently far from the wall, making the wall reflections so dense in frequency and low in level as to reduce the effect of the reflections.
All acoustic reflections from the wall located behind the loudspeaker can be eliminated by creating an acoustically sealed recess in the wall and installing the monitor in the recess so that the monitor front baffle is flush with the wall. This method is called flush mounting and is the ideal scenario. However, we recognise that in most cases flush mounting is not possible – just be sure to follow the rules above so that the listening position is not compromised and be free of any phase cancellation.

-
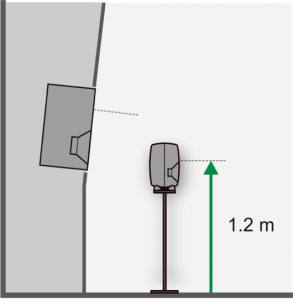
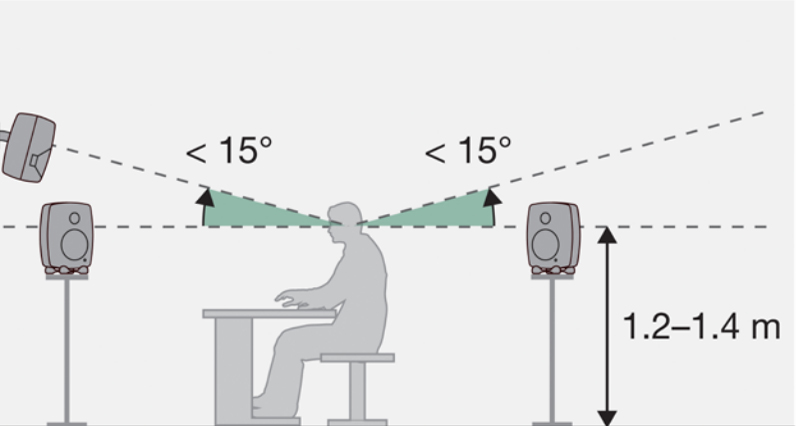
Monitor Height
The recommended height of the monitor is ear level, to ensure a balanced reproduction of the loudspeaker’s frequency response at the listening position. The acoustic axis is ideally placed between 1.2 and 1.4 metres from the floor. Placing the monitors higher, with a slight downward tilt, reduces the effect of floor reflections at the listening position, however, do not lift the monitors so high that more than 15 degrees of tilt is required for aiming. Monitors should always be aimed towards the listening position. Monitor height at half the room height should usually be avoided.
-
Monitor Angle
1.4 m is the average height between sitting and standing positions. Aim to mount your monitors less than 15 degrees above the listening height.
-
Monitor Placement For Stereo
Use the room orientation that offers the best left/right symmetry – typically this is facing your monitors outwards from the smaller end of a rectangle. Place the monitors symmetrically in a 60 degree angle making sure the distance to both monitors is the same.
-
In Speaker Acoustic Adjustment
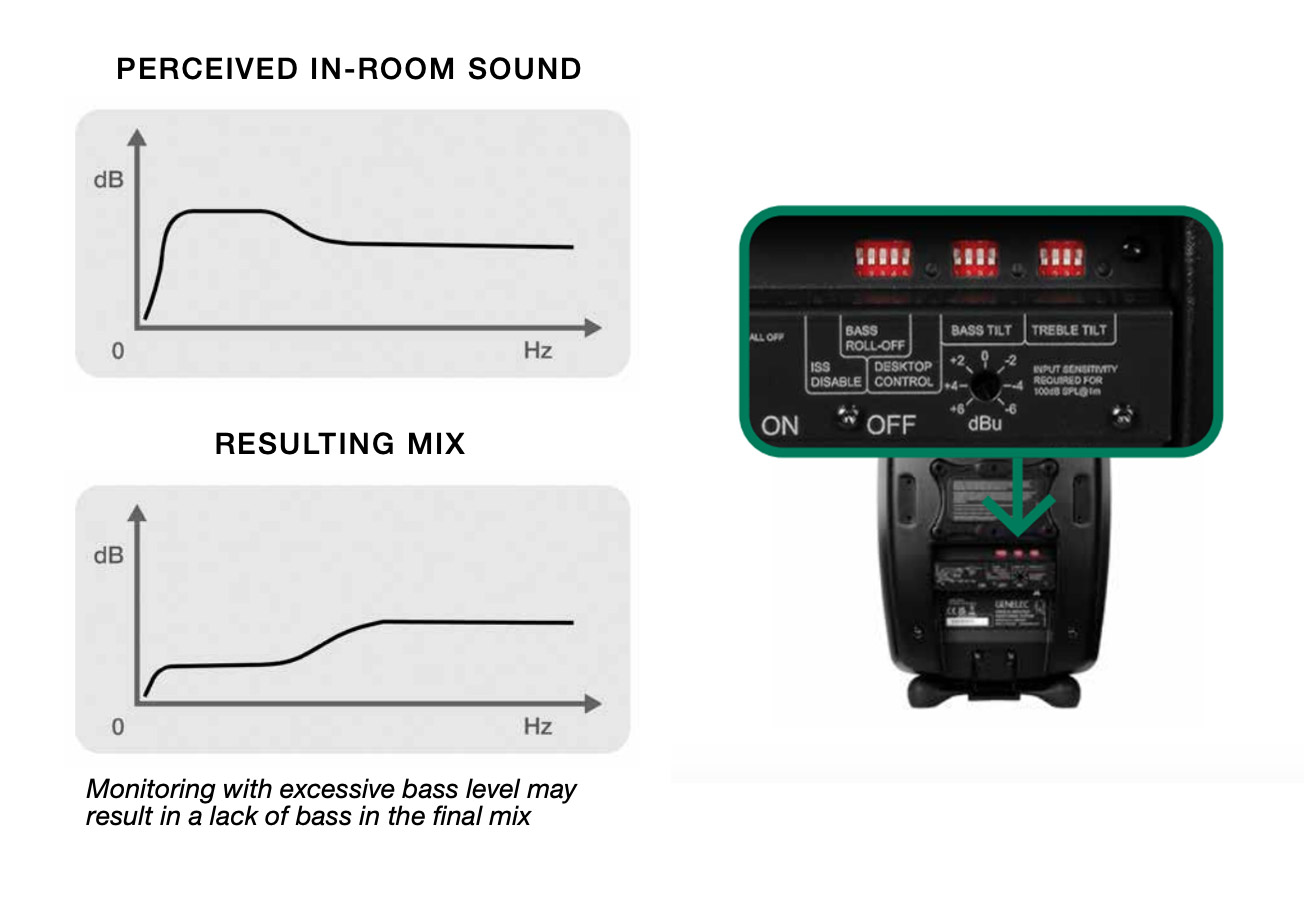
The monitoring room significantly affects sound quality. Its walls, ceiling and floor – and any large objects in the room, like mixing consoles, tables, equipment racks and furniture – reflect audio, causing changes to the sound and imaging. Acoustic calibration minimises the influence of the room on your sound, can obtain a flat and neutral frequency response and enhances the precision of imaging. Genelec active monitoring systems have room response adjustments to compensate for room influences and retrieve a flat frequency response at the listening position. DIP switch tone controls in monitors and subwoofers enable manual adjustment. Adjust the tone control DIP switches to retrieve the same flat frequency response for all monitors. For volume calibration, first set the rotary input sensitivity control on all monitors fully clockwise. Then, adjust each level control so that all monitors produce the same sound level at the listening position.
-
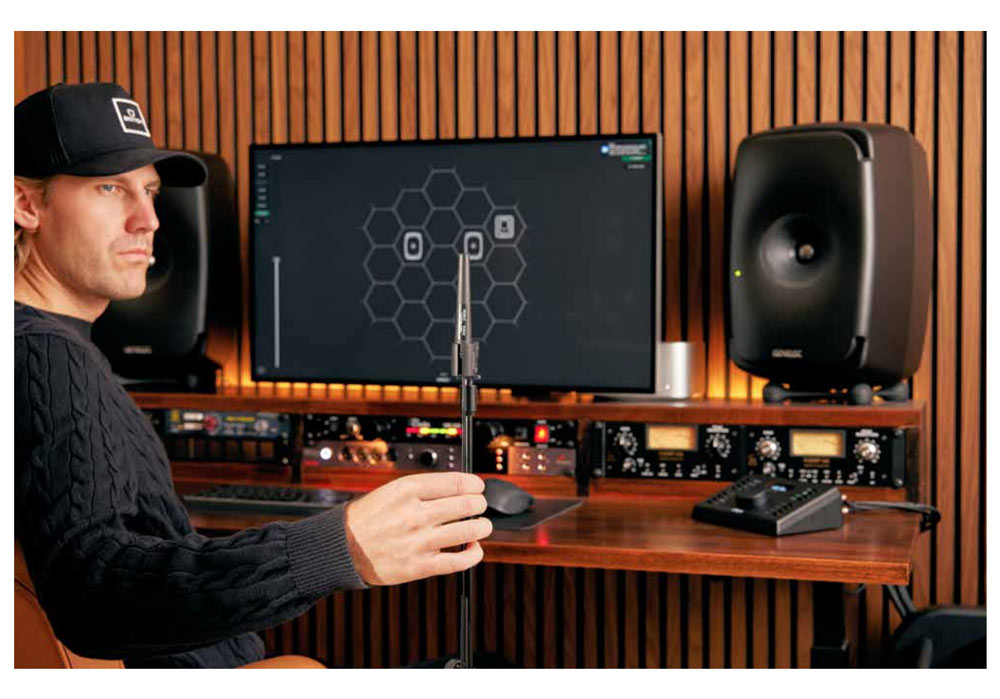
Genelec GLM Calibration Software
Genelec SAM Monitoring systems enable highly accurate monitoring and truthful audio reproduction in any room using GLM software calibration. Genelec Loudspeaker Manager (GLM) works with Genelec SAM Monitors and Subwoofers. Automatic calibration (AutoCal) in GLM adapts monitors to the room so they sound neutral and have the same level and delay at the listening position. GLM measures your room with a reference microphone and automatically adjusts the software to achieve a flat response. This minimises colouration, makes acoustic images accurate and improves the sound stage, enabling the creation of mixes that translate consistently across rooms and reproduction systems. While GLM AutoCal very quickly makes stereo systems accurate, it has even greater importance for immersive monitoring layouts. This is because it can calibrate high channel count monitoring systems reliably and precisely in just a few minutes.

-
Reflective Surfaces
Genelec in monitor dip switch adjustments and GLM calibration are the best tools to neutralise unwanted frequencies from room reflections, but it’s also important to consider acoustic treatment. Audio monitoring rooms generally need suitable acoustic treatment to enable the highest quality monitoring.
This section outlines ways to improve room acoustics.
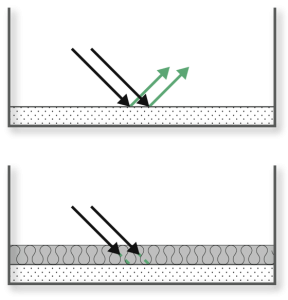
Wall surfaces, ceilings, furniture and floors can reflect, diffuse or absorb audio. Combinations of these acoustic effects are often used in treatment.
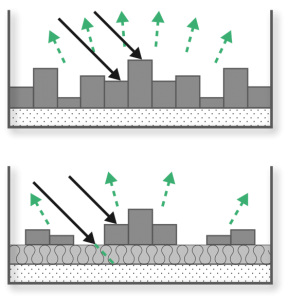
Hard surfaces such as glass, concrete, dry wall or MDF and furniture such as computer screens and production consoles reflect sound.
Soft materials such as rock wool, mineral wool, sofas, heavy curtains or thick carpets absorb sound. A thick layer of material is needed to absorb low frequencies.
-
Dispersion/Treating Higher Frequencies
Irregular surfaces scatter sound waves, causing diffusion. Diffusion is effective at mid and high frequencies. Diffusion is usually not effective at low frequencies.
-
Optimised Room Geometry
Your room shape can help eliminate unwanted reflections. Optimal situation is when you hear more direct sound from the monitors than reflected sound at the listening position. Preventing room reflections from reaching the listening area reduces sound colouration and improves imaging.
-
Acoustic Improvements
Front wall: Cut the room front corners at 30 degrees using high-mass materials (concrete, bricks, multi layered gypsum board, etc) In case building materials have medium mass, make sure to fill the empty space behind these walls with mineral wool.
Side walls: Use a combination of absorption and diffusion on the side wall surfaces. Note that thin layers of porous absorbers only reduce HF reflections
Rear: If the room is large enough, use diffusive element(s) on the back wall
-
There are many factors that influence the sound of studio monitors. We hope this monitor setup guide helps you in your quest for a flat monitoring experience. If you would like to read more about this Genelec has produced a very detailed and informative article on this topic. Click HERE to check that out.